| Software Settings |
| This is a step-by-step tutorial
for setting up CatSpy, after your camera drivers have been installed. |
|
| 1 |
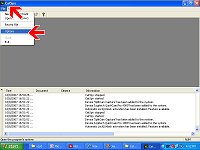
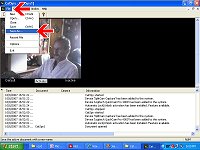
a. Start CatSpy
b. Click FILE
c. Click CatSpy1
d. Maximize window
e. Click ACTIVATE
f. Minimize CatSpy |
 |
| |
If there is not file labeled
"catspy1", continue with these instructions to configure the software |
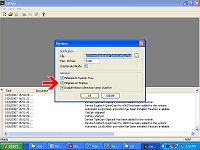
| 2 |
a. Click FILE | OPTIONS
b. Check ALL options |
 |
| |
|
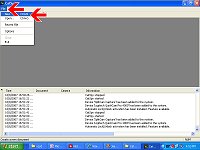
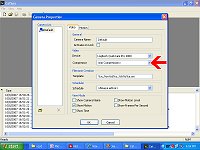
| 3 |
Click FILE | NEW |
 |
| |
|
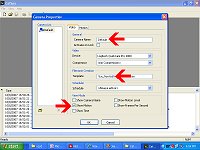
| 4 |
a. Name your webcam for your location
(Check the
Locations page for the current cameras)
b. Change File Name to be more readable
(change to read "%m%d")
(Find out more about
File Names)
c. Uncheck all; but SHOW MOTION |
 |
| |
|
| 5 |
Change COMPRESSION FACTOR This is a very important step to keep your hard drive
from filling up! |
 |
| 6 |
MS Widows Media Video 9 seems to be the best
compression rate; but the compression formats will vary per computer.
You might like to try several and compare the file sizes. Make sure to
always preview your videos before permanently changing this rate, to be
sure your computer can play that type of file. |
 |
| |
|
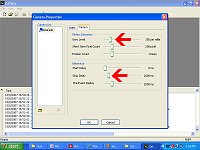
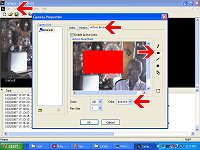
| 8 |
Motion detection is based on how many pixels
(dots of color) change from one frame to the next frame. You can adjust
the GREY LEVEL down to pick up more activity.
Click OK |
 |
| |
|
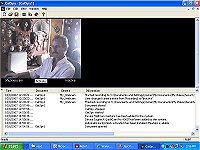
| |
CatSpy will now open the new
camera document. You may need to maximize the windows to see all
functions |
| |
|
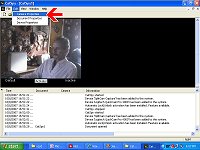
| 9 |
a.
Click the window Maximize button
b.
Click the Cam Window Maximize button
If you cannot see the ACTIVATE button,
close the Info Window |
MouseOver for more details
Click to enlarge |
| |
Some webcams are situated so that
areas in the picture frame show activity unrelated to dealership
activities. For example, reflections in a glass window or mirror, or
other items moving that we know are not suspicious activities - like
balloons moving in the breeze or fish swimming in the fish tank. If you
have one of these areas you can select areas to "block" so that any
motion in that area does not trigger a recording.
Be cautious in using this function! |
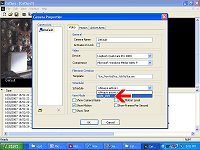
| 10 |
Click EDIT | CAMERA PROPERTIES |
 |
| |
|
| 11 |
a. Click on the ACTIVE AREA tab
b. Check ENABLE ACTIVE AREA
c. Click the Rectangle Drawing Tool
d. Highlight the area to be inactive |
 |
| |
HINT: More information
about setting the ACTIVE AREA can be
found here. |
| |
|
| 12 |
Click EDIT | DOCUMENT PROPERTIES |
 |
| |
|
| 13 |
Verify folder path for saved videos
the path to this folder should be similar to this example:
"C:\Documents
and Settings\Owner\My Documents\My Videos\Security_Videos" |
 |
| |
|
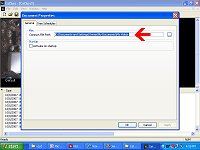
| 14 |
Click on TIME SCHEDULE tab
Click ADD SCHEDULE |
 |
| |
Determine what times your camera
should be recording. Most locations will need two entries to account for
midnight to 7:30 in the morning, and another entry for 8:00pm to
midnight for at least Mon - Sun. You could also un-select Sat and Sun
from these examples and add more entries to account for those time (for
example, since most locations are closed on Sun, if you uncheck SUN in
the two examples below, you could add an entry for Sun from 00:00 to
23:59) |
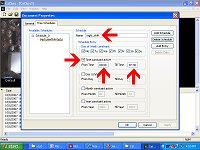
| 15 |
Change name to "night_shift"
Check TIME CONSTRAINT ACTIVE
Set times from 00:00 (midnight) to 08:00 (8:00am)
FYI: Because the cameras are monitoring after work hours, and
between two days, you will need to create two entries. One for midnight
till opening, and a second entry from closing to midnight. |
 |
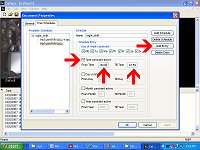
| 16 |
Click ADD ENTRY
Check TIME CONSTRAINT ACTIVE
Set times from 20:00 (8:00pm) to 23:59 (11:59pm) |
 |
| |
|
| 17 |
Click EDIT | CAMERA PROPERTIES |
|
| |
|
| 18 |
Change Schedule to "night_shift" |
 |
| |
|
| 19 |
Click FILE | SAVE
(or click the SAVE button on the toolbar) |
 |
| |
|
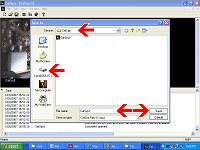
| 20 |
Save as "catspy1" in "c:/program files/catspy/"
|
 |
| 21 |
a. Click ACTIVATE once until the status is
"Off Schedule"
b. MINIMIZE the application |
|
| |
You'll notice that CatSpy is running by the icon located
in the system tray.
Optional Instructions to hide the CatSpy icon: |


